Understanding Jetting Marks in Plastic Injection Molding: Causes & Fixes
If you work in injection molding, you have likely encountered surface defects that ruin the aesthetic and structural integrity of a part. One of the most common culprits is Jetting.
In this guide, we will break down what jetting marks are, why they happen, and provide actionable engineering solutions to eliminate them from your production line.
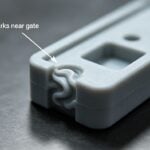
1. What are Jetting Marks? (Visual Identification)
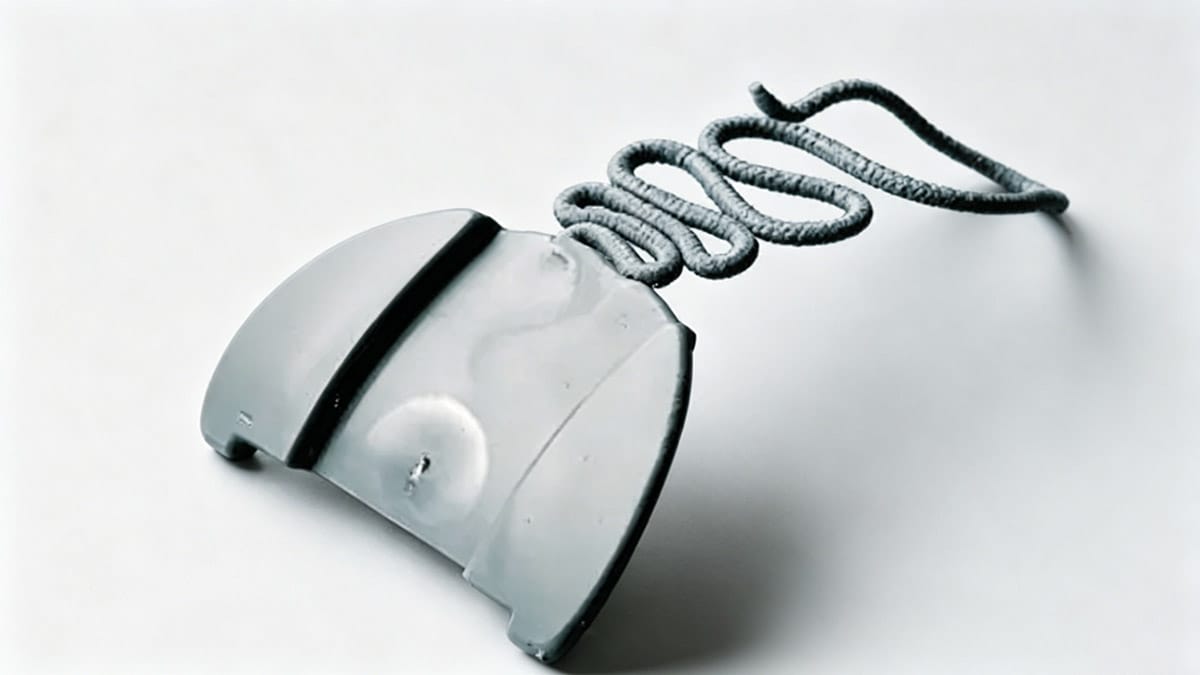
Normally, molten resin should flow into the mold cavity in a "fountain flow" pattern, expanding evenly from the gate. However, jetting occurs when the molten plastic shoots out of the gate like a rope or a jet stream instead of fanning out.
Because the material travels too fast, it does not make contact with the mold wall immediately. Instead, it snakes through the cavity, cools down, and creates visible blemishes on the final part.
Depending on the severity and material, jetting can appear as:
- Snake-like lines: Distinct wavy patterns on the surface.
- Cloudy/Mist-like patches: Often seen near the gate area.
Despite the visual differences, the root cause remains the same: unstable flow entering the cavity.
2. Root Causes of Jetting
Why does the resin shoot out instead of flowing smoothly? Here are the four primary factors:
(2-1) Small Gate Size The most significant factor is often the gate dimensions. Think of a water gun: the smaller the nozzle opening, the further and faster the water shoots. Similarly, a small gate increases pressure and velocity at that specific point, causing the melt to "squirt" into the open cavity rather than flow.
(2-2) High Injection Speed Even with a standard gate size, if the injection speed is set too high, the shear rate increases dramatically. The faster the resin is pushed through the gate, the more severe the jetting becomes.
(2-3) High Viscosity / Low Flowability If the gate size and speed are constant, the material's viscosity plays a major role. Higher viscosity (stiffer flow) resists spreading out, promoting jetting. Conditions that increase viscosity include:
- Low resin (melt) temperature.
- Low mold temperature.
- Using a material grade with inherently low flow properties.
(2-4) Insufficient Holding Pressure While holding pressure doesn't cause jetting, insufficient holding pressure can make the defect much more obvious. Proper packing helps mask minor flow irregularities.
3. Proven Solutions to Eliminate Jetting
If you are facing jetting issues, try these countermeasures in order of effectiveness.
(3-1) Optimize Gate Design (Most Effective) The best way to stop jetting is to change the physics of the entry point.
- Increase Gate Size: If the product design allows, enlarging the gate reduces the velocity of the melt entering the cavity.
- Change Gate Geometry: Use a short and wide gate land. A fan-shaped gate or a tab gate that directs the flow against a mold wall is highly effective.
(3-2) Adjust Gate Location Jetting happens when the molten plastic shoots into a large, open space.
- Redirect the Flow: Move the gate so that the plastic immediately hits a core pin or a cavity wall. This forces the material to slow down and spread out (fountain flow) instantly.
- Add an Obstacle: If moving the gate isn't possible, consider adding a pin or a small wall directly in front of the gate inside the mold to break the jet stream.
(3-3) Fine-Tune Injection Speed You don't always need to slow down the entire cycle.
- Use Multi-stage Injection: Set a slower injection speed specifically for the initial phase (passing through the gate). Once the cavity is partially filled and the flow has stabilized, you can switch back to a higher speed.
(3-4) Reduce Resin Viscosity Making the material flow easier can help it spread rather than jet.
- Increase the Resin (Barrel) Temperature.
- Increase the Schimmeltemperatuur.
- Switch to a High-Flow Grade of the same material.
(3-5) Optimize Holding Pressure Ensure your holding pressure and time are sufficient to pack out the part, which can help minimize the visual impact of flow marks.
4. Recommended Processing Parameters
Below are general guidelines for injection speed and holding pressure for common engineering plastics. Note: These are starting points; always adjust based on your specific mold and machine.
Recommended Injection Speed (Gate Velocity)
| Resin Material | Injection Speed (mm/sec) | V-P Switchover Point |
|---|---|---|
| Duracon (POM) | 8 ~ 19 | Approx. 90% Filled |
| Duranex (PBT) | 16 ~ 33 | Approx. 90% Filled |
| Fortron (PPS) | 25 ~ 42 | Approx. 90% Filled |
| Vectra (LCP) | 30 ~ 50 | Approx. 90% Filled |
Recommended Holding Pressure
| Resin Material | Holding Pressure (MPa) | Holding Time |
|---|---|---|
| Duracon (POM) | 59 ~ 98 | Gate Seal + 1~2 sec |
| Duranex (PBT) | 59 ~ 98 | Gate Seal + 1~2 sec |
| Fortron (PPS) | 39 ~ 69 | Gate Seal + 1~2 sec |
| Vectra (LCP) | 29 ~ 49 | Gate Seal + 1~2 sec |
Summary
Eliminating jetting marks requires a balance of mold design and process settings. Start by checking your gate design, as this is the most common physical cause. If mold modifications aren't immediately possible, adjusting the injection speed profile en temperatures are your best quick fixes.
Do you have questions about other injection molding defects? Leave a message below!