Struggling with PETG defects like flash and bubbles? You keep adjusting parameters, but nothing seems to work. This guide reveals the real culprits and how to finally fix them.
Mastering PETG involves strict moisture control (drying below 0.04%), precise temperature management (220-260°C barrel, 40-50°C mold), and using low packing pressure with high clamping force. Most defects come from moisture and tooling, not just injection parameters.

I've spent years on the shop floor, and I've seen countless engineers get trapped by PETG. It's a fantastic material, but it can be tricky. You think you've solved one problem, and two more pop up. The key is to stop chasing symptoms and start understanding the root causes. This guide is built from that hands-on experienc e, showing you the practical steps to take control of your PETG production. Let's dive in and get it right.
What Is PETG and Why Does It Matter in Injection Molding?
Problem: You need a clear, tough, and easy-to-process plastic for your project. Agitate: But materials like PC are expensive and hard to mold, while others lack clarity. Solution: PETG offers a perfect balance.
PETG, or Polyethylene Terephthalate Glycol, is a versatile thermoplastic copolyester. It's important in injection molding because it combines the clarity of acrylic, the toughness of polycarbonate (PC), and the easy processing and chemical resistance of many other plastics, making it a valuable, cost-effective choice.
PETG stands out in the world of plastics. Think of it as a modified version of PET, the material used for water bottles. The "G" stands for glycol, which is added during polymerization. This simple addition is a game-changer. It prevents the material from crystallizing when heated, which is what makes standard PET hazy and brittle if you try to mold it thick.
This modification gives PETG its unique combination of properties. I've used it on projects where clients needed a part that was almost as clear as glass but could also withstand being dropped without shattering. It's less prone to stress whitening than other clear plastics and has excellent chemical resistance, holding up against cleaners and oils. This combination of toughness, clarity, and moldability makes it a go-to material for a huge range of applications, from medical devices to consumer product displays. It truly hits a sweet spot that few other materials can match.
What Are the Key Material Properties of PETG?
Problem: Choosing the right plastic is overwhelming. Agitate: You need to balance cost, performance, and appearance, but the data sheets are confusing. Solution: PETG's unique properties make it a top contender.
PETG's key properties are its excellent clarity and gloss, high impact strength (toughness), good chemical resistance, and ease of processing. It is also FDA-compliant, making it suitable for food contact applications, and it doesn't require pre-drying as intensely as polycarbonate.
When I'm helping a client choose a material, I always come back to the practical application. PETG often wins because it checks so many boxes. It’s not just about one single property, but the combination of them. For example, its impact strength is fantastic. It's not quite as tough as polycarbonate, but it's much tougher than acrylic and doesn't have PC's issues with stress cracking from certain chemicals. I've seen PETG parts take a beating that would have shattered other clear plastics.
Its chemical resistance is another huge plus. This makes it ideal for medical device housings that need to be wiped down with harsh disinfectants. To put it in perspective, let's look at a quick comparison.
Key Property Showdown
| Propriété | PETG (Polyethylene Terephthalate Glycol) | PC (Polycarbonate) | PMMA (Acrylique) |
|---|---|---|---|
| Clarity | Excellent, glass-like | Excellent, can have a blue tint | Excellent, best optical clarity |
| Impact Strength | Haut | Very High (best in class) | Low (brittle) |
| Résistance chimique | Bon | Poor (susceptible to oils, cleaners) | Bon |
| Processing | Easy, lower temperatures | Difficult, requires high temps & drying | Modéré |
| Coût | Modéré | Haut | Low to Moderate |
As you can see, PETG offers a balanced profile. It's the reliable all-rounder that delivers great results without the processing headaches or high cost of more specialized materials.
How Do You Prepare PETG for Injection Molding?
Problem: Your PETG parts have splay marks and bubbles. Agitate: You've tried adjusting every setting on the machine, but the defects persist. Solution: The problem isn't your machine; it's your material prep.
Properly preparing PETG is all about drying. The material is hygroscopic and must be dried in a desiccant dryer at 65-75°C (150-165°F) for 4 to 6 hours. Your goal is to get the moisture content below 0.04% before it enters the barrel.
I cannot stress this enough: drying is non-negotiable. I'd say 90% of the PETG defects I'm asked to troubleshoot come back to improper drying. PETG is like a sponge; it absorbs moisture right from the air. If you mold it wet, that moisture turns to steam in the hot barrel. This causes a chemical reaction called hydrolysis, which breaks down the polymer chains. The result isn't just cosmetic defects like splay and silver streaks; the part becomes incredibly brittle and loses all its strength. You could have a part that looks perfect but snaps like a cracker.
On our production floor, we are religious about our drying protocol. Every batch of PETG goes into a desiccant dryer. We don't use simple hot air ovens because they just circulate moist air. A desiccant dryer uses material that actively pulls moisture out. We monitor the dew point of the drying air to ensure it's effective. After drying, the material goes into a heated hopper on the machine to prevent it from re-absorbing moisture while it waits to be molded. If you get the drying right, you've won half the battle.
What Are the Optimal PETG Injection Molding Parameters?
Problem: You've dried your PETG perfectly, but you're still getting flash or sink marks. Agitate: You raise pressure to fix sinks, but get flash. You lower it and the sinks return. Solution: PETG requires a unique "low and slow" approach.
Optimal PETG parameters involve moderate temperatures (220-260°C barrel, 40-50°C mold), a medium-to-low injection speed, and very low packing pressure (30-40% of injection pressure). The key is to avoid forcing this high-flow material, which causes flash.
The biggest mistake I see people make is treating PETG like other plastics. Because it flows so easily, it's incredibly sensitive to pressure. If you use the high packing pressures typical for materials like ABS or PC, you will blow flash out of every seam in your mold. It's like trying to contain water with a screen door.
My approach is to use just enough energy to get the job done. We start with a moderate temperature profile and a controlled injection speed. I often program a multi-stage injection, starting a bit faster to fill the bulk of the part and then slowing down significantly as we approach the end of the fill. This prevents pressure spikes that cause flash. The most critical part is the switch from injection to packing. We drop the pressure way down, often to just 30% of the peak injection pressure. The packing phase is just to hold things in place and compensate for a tiny bit of shrinkage, not to cram more material in.
Here is a typical starting point I use on the floor:
PETG Processing Parameter Guide
| Paramètres | Recommended Value | Why It's Important |
|---|---|---|
| Drying Temp/Time | 65-75°C / 4-6 hours | Prevents hydrolysis, brittleness, and splay. |
| Température du canon | 220-260°C (430-500°F) | Too hot causes degradation/yellowing; too cold causes flow lines. |
| Température du moule | 40-50°C (100-120°F) | Critical for surface finish. Too low = hazy; too high = sticking. |
| Vitesse d'injection | Medium to Low | Prevents jetting and reduces shear heating. |
| Packing Pressure | Low (30-40% of Injection) | The most important setting to prevent flash. |
| Back Pressure | Low (0.35-0.7 MPa) | Ensures good melt consistency without degrading the material. |
Remember, these are starting points. Every mold and machine is different, but the principle remains: treat PETG gently.
How Should You Design Molds for PETG Parts?
Problem: You're getting flash on your PETG parts even with low pressure. Agitate: You suspect the mold, but you're not sure what to look for. Solution: Your mold needs to be built to contain a liquid-like plastic.
Molds for PETG must have impeccable parting line fits and tight-tolerance components. Vents must be very shallow (0.01-0.02 mm) to let air out without letting plastic escape. Also, a high-quality polish on cavity surfaces is essential for part clarity.
When we quote a tool for a PETG part, we know from the start that precision is everything. PETG's high flowability means it will find any gap, no matter how small. Think of it like this: if your mold can't hold water, it can't hold molten PETG.
The first area we focus on is the parting line. The two halves of the mold must meet with zero-gap contact. We call this a "kiss-off" fit. The same goes for any moving components like slides, lifters, or ejector pins. Any clearance is a potential path for flash. Venting is another critical area. Vents are tiny channels that let trapped air escape the cavity as plastic flows in. For most plastics, vents can be 0.03-0.05 mm deep. For PETG, we have to cut that in half, down to 0.01-0.02 mm. Any deeper, and the PETG will flow right into the vent, creating a thin, sharp web of flash that's difficult to remove. Finally, don't forget the gate. A submarine or pin gate is often preferred to keep the gate vestige small and easy to trim cleanly.
What Are the Common PETG Injection Molding Defects and Solutions?
Problem: Your PETG parts are failing quality control. Agitate: You're wasting time and material trying to diagnose frustrating issues like brittleness, yellowing, or warping. Solution: A systematic troubleshooting guide can pinpoint the exact cause.
Most PETG defects stem from three core issues: moisture in the material, excessive heat or pressure during processing, or inadequate mold design. Systematically checking drying, temperatures, pressures, and tool fit will solve the majority of problems.
I've spent countless hours huddled over a molding machine, trying to solve these exact problems. It feels like a puzzle, but once you understand PETG's nature, it becomes much easier. The key is to not jump to conclusions. For example, if you see bubbles, your first instinct might be to increase packing pressure to squeeze them out. With PETG, this is usually wrong. The bubbles are likely steam from wet material, and adding pressure will just cause flash.
Here’s a troubleshooting table I've built from my experience. I tell my new technicians to print this out and keep it in their toolbox. It’s a roadmap for solving the most common issues we see with PETG.
PETG Troubleshooting Guide
| Défaut | Potential Cause(s) | Solution(s) |
|---|---|---|
| Flash | 1. Packing/Injection pressure too high. <br> 2. Mold clamping force too low. <br> 3. Worn or poorly fitting mold. <br> 4. Vents are too deep. | 1. Reduce packing pressure to 30-40% of injection. <br> 2. Increase clamping force by 15-20%. <br> 3. Inspect and repair mold parting line. <br> 4. Ensure vents are <0.02mm. |
| Splay / Silver Streaks | 1. Material is wet (moisture content > 0.04%). <br> 2. Excessive shear heat from high injection speed. | 1. Dry material properly (65-75°C for 4-6 hrs). Use a desiccant dryer. <br> 2. Reduce injection speed. |
| Bubbles / Voids | 1. Trapped moisture (hydrolysis). <br> 2. Part is too thick. <br> 3. Insufficient packing pressure (less common). | 1. Check drying first! This is the most common cause. <br> 2. Redesign part for more uniform wall thickness. <br> 3. Slowly increase packing time/pressure, but watch for flash. |
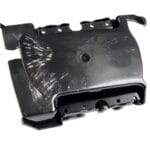
| Brittleness | 1. Hydrolysis from wet material. <br> 2. Material degradation from excessive temperature. | 1. Dry material thoroughly. <br> 2. Lower barrel temperatures; ensure residence time isn't too long. |
| Yellowing | 1. Barrel temperature is too high (>260°C). <br> 2. Material is in the barrel for too long (residence time). | 1. Lower barrel temperature profile. <br> 2. Use a machine with the correct shot size to reduce residence time. |
| Sticking in Mold | 1. Mold temperature is too high. <br> 2. Insufficient draft angles. <br> 3. Poor surface polish in the cavity. | 1. Lower mold temperature to 40-50°C. <br> 2. Increase draft angles on part design. <br> 3. Polish mold surfaces to A2 or better. |
What Industries and Applications Use PETG Injection Molding?
Problem: You're not sure if PETG is the right fit for your specific product or industry. Agitate: Choosing the wrong material can lead to product failure and costly recalls. Solution: See how PETG excels in demanding, real-world applications.
PETG is widely used in the medical, consumer products, and electronics industries. Its unique combination of toughness, clarity, chemical resistance, and FDA compliance makes it ideal for everything from medical device housings to retail displays and food containers.
The versatility of PETG is one of its greatest strengths. I've worked on projects across so many different sectors using this material, and it consistently delivers.
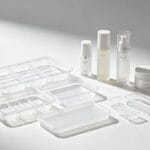
In the medical field, it's a star player. We mold trays, diagnostic test kits, and housings for handheld devices from PETG. Why? It can withstand sterilization processes like gamma radiation without becoming brittle or discolored. Its excellent chemical resistance means it won't break down when exposed to cleaning agents used in hospitals.
Pour consumer products, it's all about aesthetics and durability. Think high-end cosmetic packaging, clear refrigerator bins, or protective cases for electronics. PETG provides that premium, crystal-clear look, but unlike acrylic, it can handle being dropped. We also use it for point-of-purchase displays in retail stores because it’s tough enough to withstand the bumps and knocks of a busy environment.
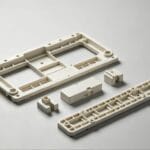
In the electronics industry, it’s used for protective covers, light pipes, and connectors. Its clarity is great for indicator lights, and its toughness protects sensitive components. It's a reliable, cost-effective alternative to polycarbonate for many applications where extreme impact strength isn't the number one priority.
PETG vs. Other Transparent Plastics — How Does It Compare?
Problem: You need a clear plastic, but the options are confusing. Agitate: PC is strong but expensive, and acrylic is clear but brittle. It's hard to find the right balance. Solution: PETG occupies a valuable middle ground.
PETG offers a better balance of properties than many other clear plastics. It is tougher and more chemical-resistant than acrylic (PMMA), and easier and cheaper to process than polycarbonate (PC), though not quite as impact-resistant.
Choosing the right transparent plastic is a classic engineering trade-off. I always ask clients, "What's the one thing this part absolutely cannot do? Break? Discolor? Crack?" The answer usually points us to the right material. PETG is often the answer when the client says, "I need it to be clear, tough, and not break the bank."
Let’s break it down in a more direct comparison:
PETG vs. Acrylic (PMMA): I call acrylic "look-don't-touch" plastic. It has incredible optical clarity, even better than PETG, and a hard surface that resists scratches. But it's very brittle. A short drop onto a hard floor can shatter it. PETG is far more forgiving. It has excellent impact strength, so it bends or dents where acrylic would crack. If your part needs to survive any kind of handling or potential impact, PETG is the superior choice.
PETG vs. Polycarbonate (PC): PC is the king of impact strength; it's virtually unbreakable. However, this toughness comes with baggage. PC is difficult to process, requiring very high temperatures and meticulous drying. It's also more expensive and has poor chemical resistance—common cleaning agents can cause it to haze and crack. PETG is much easier to mold, has better chemical resistance, and comes at a lower price point. For most applications that don't involve stopping bullets, PETG's toughness is more than sufficient.
How Does Idealpro Run PETG in Production?
Problem: You need a manufacturing partner who truly understands PETG's quirks. Agitate: Many molders treat it like any other plastic, leading to delays, defects, and cost overruns. Solution: Our process is built on a deep understanding of the material.
At Ideal Pro, we follow a strict "golden rule" for PETG: Dry thoroughly, stabilize temperature, use low packing pressure, and maximize clamping force. We don't guess; we control every variable to ensure consistent, high-quality parts every time.
When a PETG project comes through our doors, we don't just load the material and press start. We have a specific, battle-tested methodology. It all comes back to our golden rule, which addresses the two-faced nature of PETG: its high flow and its sensitivity to moisture.
First, Dry Thoroughly. Our production floor is equipped with top-of-the-line desiccant dryers. We verify moisture content is below 0.04% before any material gets near a machine. The hopper on the machine itself is heated to prevent any moisture re-absorption during production runs.
Second, Stabilize Temperature. We use precise temperature controllers for both the barrel and the mold. We know that for PETG, the mold temperature is just as important as the barrel temperature for achieving a perfect finish. We keep it right in that 40-50°C sweet spot.
Third, Use Low Packing Pressure. This is where experience really shows. Our technicians are trained to resist the urge to crank up the pressure. They use a delicate touch, setting packing pressure low and time short, letting the part cool and solidify without forcing it.
Finally, Maximize Clamping Force. We know PETG will exploit any weakness. We calculate the required clamping force and often add a 15-20% safety margin. We also ensure our molds are built to the highest standard, with tight parting lines that can contain the material's liquid-like flow. This disciplined approach is how we turn a tricky material into a reliable solution for our clients.
Frequently Asked Questions About PETG Injection Molding?
Problem: You still have some specific questions about handling PETG. Agitate: Conflicting advice online makes it hard to find clear, reliable answers to common problems. Solution: Here are direct answers from my shop-floor experience.
Here are rapid-fire answers to the most common questions I get about PETG. These cover everything from color changes and sticking to why your parts might be brittle, giving you quick, actionable solutions.
I get asked these questions all the time, both by clients and by new engineers on my team. Let's clear them up once and for all.
Why do my PETG parts have a yellow tint?
This is almost always a sign of overheating. Either your barrel temperature is set too high (anything above 260°C is risky), or the material is sitting in the hot barrel for too long (long residence time). Lower your temperatures and check if your machine's shot size is appropriate for the part.
How do I stop my PETG parts from sticking in the mold?
First, check your mold temperature. If it's too high (above 50-60°C), the part surface stays soft and adheres to the steel. Lower it. Second, look at the part design. Are there adequate draft angles? At least 1-2 degrees is needed. Finally, never, ever use silicone-based mold release spray. It contaminates the mold and makes flashing worse over time.
Can I use a hot runner system with PETG?
Yes, absolutely, but it must be designed correctly. An externally heated system is generally preferred over an internally heated one to minimize the risk of overheating and material degradation. The flow channels should be open and unobstructed to prevent material from hanging up and degrading.
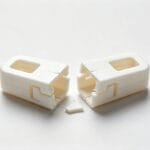
Why are my parts brittle even if they look perfect?
This is the silent killer with PETG: hydrolysis. The material was almost certainly molded wet. Even if you don't see splay marks, the moisture has broken down the polymer chains, destroying the material's inherent toughness. There is no fix for this after the fact; the only solution is to enforce a strict drying protocol.
How to Get Started with PETG Injection Molding?
Problem: You're convinced PETG is right for your project but don't know the next steps. Agitate: Finding a reliable partner who can handle the material and your design is a challenge. Solution: Start with a conversation based on a solid plan.
To get started, review your part design with PETG's properties in mind. Then, partner with an experienced molder. Provide them with your 3D files and requirements, and have an open discussion about material selection, mold design, and processing.
Taking the first step is easier than you think. It begins with a simple review and a conversation.
First, take a critical look at your part design. Can you ensure uniform wall thickness? Can you add generous radii to corners to help the material flow? Are there draft angles of at least 1 degree on all vertical faces? Making these small adjustments now will save you major headaches later.
Second, find a partner, not just a supplier. You need a molder who speaks the language of PETG. When you talk to them, ask them about their drying process. Ask them what packing pressures they typically use for PETG. If they give you generic answers, they may not have the specific experience you need.
At Ideal Pro, we love these conversations. We believe in being a true partner, offering our expertise from the very beginning. The best way to start is to send us your 3D file and tell us about your project. We'll provide a free DFM (Design for Manufacturability) analysis and a quote. We'll point out potential challenges and suggest solutions before we even cut steel. This collaborative approach ensures your project is a success from the start.
Conclusion
Mastering PETG is about control, not force. By focusing on drying, precise temperatures, and smart pressure management, you can unlock its full potential for clear, tough, and beautiful parts.