La vérité ? Le moulage par injection n'est pas une filière linéaire. C'est un système axé sur le retour d'information, Il s'agit d'un cas où un défaut à l'étape 1 (conception) se répercute aux étapes 5 à 8 sous forme de gauchissement, d'enfoncement ou d'incohérence des dimensions.
Ce guide va plus loin que “serrage → injection → refroidissement”. Nous vous guiderons à travers les 8 phases critiques, ainsi que les 3 boucles de contrôle cachées qui séparent les pièces fonctionnelles d'une production rentable et évolutive.

Le processus de moulage par injection peut être décourageant, en particulier lorsque l'on vise une fabrication sans défaut. Les défis sont nombreux, mais la compréhension des phases clés peut faire toute la différence. Examinons chaque phase pour nous assurer que nous ne nous contentons pas de produire des pièces, mais que nous les produisons avec précision et cohérence.
Phase 1 : Conception pour la moulabilité (DFM) - Où commencent 87% des défaillances ?
La plupart des équipes traitent la DFM comme une liste de contrôle. Les meilleurs ateliers la traitent comme résolution de contraintes basée sur la physique.
Les règles clés que vous ne pouvez pas ignorer :
- Rapport d'épaisseur de paroi ≤ 1,5:1 (pas 2:1 !) - sinon, le rétrécissement différentiel provoque un affaissement, même avec un emballage parfait.
- Les nervures doivent être ≤ 60% paroi nominale - et comprennent projet ≥ 1 des deux côtés. Il n'y a pas d'exception.
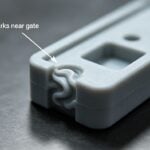
- Emplacement de la porte n'est pas une question de commodité - il s'agit de symétrie du front d'écoulement. Utilisez la fonction Différence de temps de remplissage (< 5% variation = sécurité).
💡 Conseil de pro : Exécutez un “Analyse de sensibilité au rétrécissement” dans votre outil IAO :
ΔDimension / ΔMeltTemp> 0,02 mm/°C ? Redesign - votre fenêtre de processus est trop étroite.

Il est essentiel de comprendre les subtilités de la conception pour la moulabilité. De nombreux concepteurs négligent les facteurs physiques en jeu. La prise en compte correcte de l'épaisseur des parois et des dimensions des nervures peut permettre d'éviter des problèmes ultérieurs. Les nervures ont leur utilité, mais si elles ne sont pas conçues correctement, elles peuvent être à l'origine de graves problèmes.
Phase 2 : Ingénierie des moules - Au-delà de la cavité et du noyau ?
Un moule n'est pas seulement de l'acier. C'est un système thermique-fluide.
Sous-systèmes à validation obligatoire :
| Sous-système | Mode de défaillance | Méthode de validation |
|---|---|---|
| Équilibre du circuit de refroidissement | Déformation à partir de ΔT > 3°C dans la cavité | Thermographie infrarouge à 10 000 cycles |
| Disposition des broches d'éjection | Collage ou marque due à une force inégale | FEA de la contrainte d'éjection (max < 8 MPa) |
| Profondeur d'aération | Marques de brûlure à 0,015 mm (et non 0,025 !) | Vidéo haute vitesse du front de remplissage emprisonnant l'air |
⚠️ Contrôle de la réalité : 42% des allégations de “dégradation matérielle” sont en fait mauvaise ventilation - confirmée par chromatographie en phase gazeuse des résidus de combustion.
Dans l'ingénierie des moules, l'accent doit être mis sur une bonne gestion thermique. Si le refroidissement n'est pas équilibré, le gauchissement peut devenir un problème sérieux. Il ne s'agit pas seulement de la conception du moule, mais aussi de la façon dont il interagit avec le matériau pendant le traitement. Une validation correcte permettra d'économiser du temps et de l'argent à long terme.
Phase 3 : Sélection des matériaux - Il n'y a pas que l'IMF ?
Le MFI (Melt Flow Index) est un point de départ et non une spécification.
La vraie triade :
- Comportement du PVT - Comment le volume spécifique change-t-il en fonction de P et T ? (essentiel pour la prédiction de la contraction)
- Cinétique de la cristallinité - Pour les résines semi-cristallines, le temps de gel de la porte = f(température de début de cristallisation)
- Sensibilité à l'humidité - Le PC s'hydrolyse à >0,02% d'humidité → chute du poids moléculaire → pièces fragiles
Action : Demande Fichiers de la base de données PVT (.pvtd) de votre fournisseur de résine - importez dans Moldflow pour une précision dimensionnelle de ±0,05 mm.
Le choix du matériau peut faire ou défaire le processus. Il est essentiel de comprendre le comportement du PVT. Si nous nous concentrons uniquement sur le MFI, nous passons à côté de facteurs clés qui affectent le produit final. Chaque résine se comporte différemment en fonction de la température et de la pression. Connaître ces comportements permet de prévoir les problèmes avant qu'ils ne surviennent.
Phase 4 : Développement du processus - Le cadre de réglage à trois niveaux ?
Oubliez “remplir 98%, emballer 80 MPa”. Utilisez plutôt ceci :
Couche 1 : Base de référence fondée sur la physique
- Définir le transfert initial via court-circuit + inflexion de poids (pas de vis)
- Pression de maintien = 50-70% du pic d'injection (amorphe) ou 60-80% (semi-cristallin)
Couche 2 : Pression de la cavité en boucle fermée
- Déclencher le commutateur V/P lorsque dP/dt > 7 bar/ms au capteur de la porte
- Diminution de la pression de maintien sur une période de 0,3 à 0,5 s pour réduire les contraintes résiduelles
Couche 3 : Robustesse statistique
- L9 DOE on : Transfert %, Pression de maintien, Temps de maintien
- Cible : CPK ≥ 1,67 sur la dimension critique
- Moniteur avec cartes X̄-R - alarme si σ > 0,015 mm
Le développement de processus nécessite une approche structurée. Le cadre de réglage à trois niveaux est essentiel. Il nous permet de ne plus nous contenter de remplir des moules, mais de comprendre la physique qui sous-tend chaque étape. Le contrôle de ces couches permet des ajustements en temps réel qui peuvent prévenir les défauts avant qu'ils ne se produisent.
Phase 5 : Analyse approfondie de la position de transfert - Le moment décisif ?
→ Voir votre précédente plongée en 6 sections, mais restructurée comme suit :
- Pourquoi 97.3% ≠ 97.3% (dépendance à l'égard des matériaux/moules)
- Taux de ΔP à double capteur comme étalon-or
- Protocole de synchronisation multicavité (tables de décalage par cavité)
- Coût d'une erreur de transfert: $4,324/lot quantifié
La position de transfert joue un rôle crucial dans le maintien de la qualité. Si elle n'est pas réglée correctement, même des ajustements mineurs peuvent entraîner des défauts importants. L'utilisation de systèmes à double capteur et la synchronisation des installations multicavités peuvent améliorer considérablement la cohérence de l'ensemble du processus.
Phase 6 : Validation du premier article - Au-delà du contrôle dimensionnel ?
Ne vous contentez pas de mesurer la longueur/largeur. Validez les Les 4 piliers:
- Stress interne - Photoélasticité ou jauge de contrainte par perçage de trous
- Résistance de la ligne de soudure - Essai de microtraction au niveau de la soudure par rapport à la masse
- Hauteur du portail Vestige - Profilomètre laser (cible : ≤ 0,03 mm)
- Temps de cycle Stabilité - σ du temps de cycle < 0,8s sur 100 cycles
📊 Exemple : Un connecteur a passé le contrôle dimensionnel (CPK=1,8) mais a échoué au test de chute - cause première : contrainte résiduelle élevée à la base de la nervure (mesurée à 28 MPa contre 15 MPa maximum autorisé).
La validation du premier article doit aller au-delà des contrôles de surface. Il est essentiel de se concentrer sur les contraintes internes et la résistance des lignes de soudure pour garantir l'intégrité de la pièce pendant son utilisation. En testant chaque aspect, on peut éviter des défaillances coûteuses à un stade ultérieur du cycle de production.
Phase 7 : Montée en puissance de la production - Les tueurs cachés ?
La mise à l'échelle de 100 à 10 000 pcs/jour échoue pour les raisons suivantes :
- Dérive des lots de résine (IMF ±15% → décalage de transfert de 0,6%)
- Fluctuation de la température du refroidisseur (+2°C → temps de gel de la porte +0,12s)
- Vérifier l'usure de la bague → glissement du canon → fausse détente à vis
Protocole d'atténuation :
- ✅ Matrice de qualification des lots: Tester le nouveau lot de résine par rapport à la pièce d'or (CTQs uniquement)
- ✅ Script d'auto-compensation: Si la dérive de la température de fusion est > ±3°C, ajustez le transfert % de -0,2%/°C.
- ✅ Recalibrage hebdomadaire du capteur: Utilisation d'une référence courte
La montée en puissance peut réserver des surprises. Il est essentiel de surveiller les lots de résine et de veiller à ce que la température reste stable. La mise en place d'un plan d'atténuation permet d'éviter que de petits problèmes ne se transforment en retards de production coûteux.
Phase 8 : Amélioration continue - Boucler la boucle ?
Les personnes les plus performantes utilisent :
- Digital Twin Sync: Données réelles de la machine → mise à jour hebdomadaire du modèle de matériau Moldflow
- Défauts, causes premières, IA: NLP sur les journaux d'atelier + pression de la cavité → auto-tag “transfert trop tardif” pour les marques d'évier
- Répartition de l'OEE par phaseLe système de gestion de l'information de l'entreprise est le suivant : par exemple, “Perte de serrage : 4,2% en raison du cycle de chauffage du moule”.”
🌐 Vérité finale : la meilleure ligne de moulage par injection ne permet pas de fabriquer des pièces parfaites.
Il fait des parties prévisiblement bonnes - et sait pourquoi alors qu'ils ne le sont pas.
L'amélioration continue est l'épine dorsale de toute opération réussie. L'utilisation des données et l'adaptation des processus peuvent conduire à de meilleurs résultats au fil du temps. L'adoption d'une culture de l'apprentissage permet de s'assurer que chaque cycle s'améliore par rapport au précédent, ce qui favorise l'efficacité et la qualité.
Conclusion
Le moulage par injection n'est pas magique. C'est de la la physique des polymères appliquée, la mécanique de précision et la discipline des données. Commencez par une DFM qui respecte le comportement des matériaux. Ajustez le transfert en utilisant la pression de la cavité - pas l'espoir. Réalisez une mise à l'échelle avec une compensation en boucle fermée - pas d'héroïsme.
En procédant de la sorte, vous ne vous contenterez pas de produire des pièces détachées.
Vous vous approprierez le processus.