Analysis and Troubleshooting of Sink Marks in Custom Plastic Injection Molding1
Sink marks (also known as depressions or sink marks) are one of the most common defects in the injection molding industry. For manufacturers of custom plastic parts2, understanding the root cause is the first step toward quality control.
This guide analyzes why sink marks occur and provides actionable solutions to eliminate them from your production line.
What are Sink Marks?
A sink mark is a local inward contraction on the surface of a molded part. It typically appears as a shallow depression or a dimple.
These defects usually occur in areas where the wall thickness is greater, such as near bosses, ribs, or external corners. The fundamental cause is the thermal expansion and contraction of thermoplastic materials. As the plastic cools and solidifies, it shrinks. If the internal material shrinks more than the outer skin (which has already solidified), the surface gets pulled inward, creating a depression.
Key Factors Influencing Shrinkage:
- Material properties (Thermal expansion coefficient)
- Mold temperature and Melt temperature
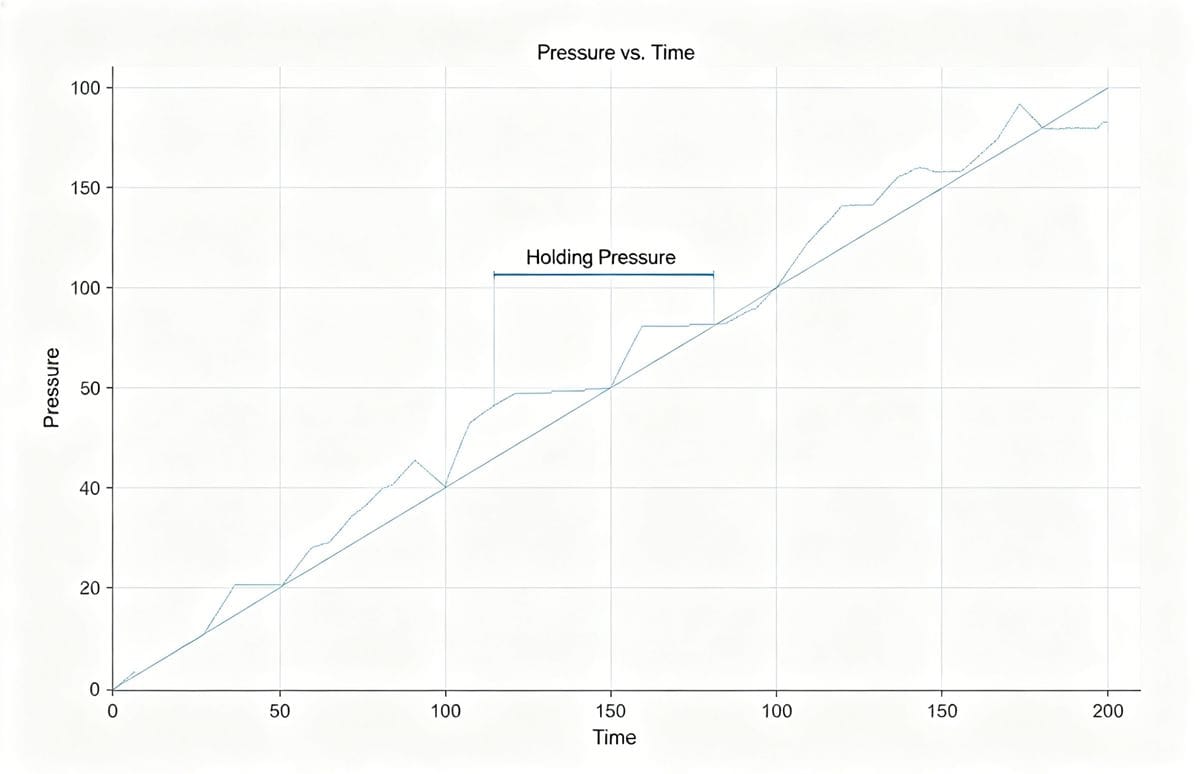
- Holding pressure and Cooling rate
- Part geometry (Wall thickness variations)
1. Improper Molding Process Conditions
Often, sink marks are the result of incorrect machine settings. Adjusting the processing parameters is usually the first and easiest step to troubleshoot the issue.
- Injection Pressure & Speed: If the pressure is too low or the speed is too slow, the melt density decreases, leading to shrinkage. 솔루션: Increase injection pressure and speed to compress the melt.
- Holding Time: If the gate freezes before the part is fully packed, shrinkage occurs. 솔루션: Extend the holding time to compensate for volume shrinkage.
- Temperature Control: High melt or mold temperatures require longer cooling times. 솔루션: Lower the melt temperature and ensure the mold cooling system is efficient.
- Cooling Time: Ejecting a part while it is still too hot causes it to deform and sink. 솔루션: Increase the cooling time in the mold.
- Insert Temperature: If the temperature around metal inserts is too low, the melt shrinks rapidly upon contact. 솔루션: Preheat the inserts3.
2. 금형 설계4 Defects
If process adjustments fail, the issue may lie within the mold design itself.
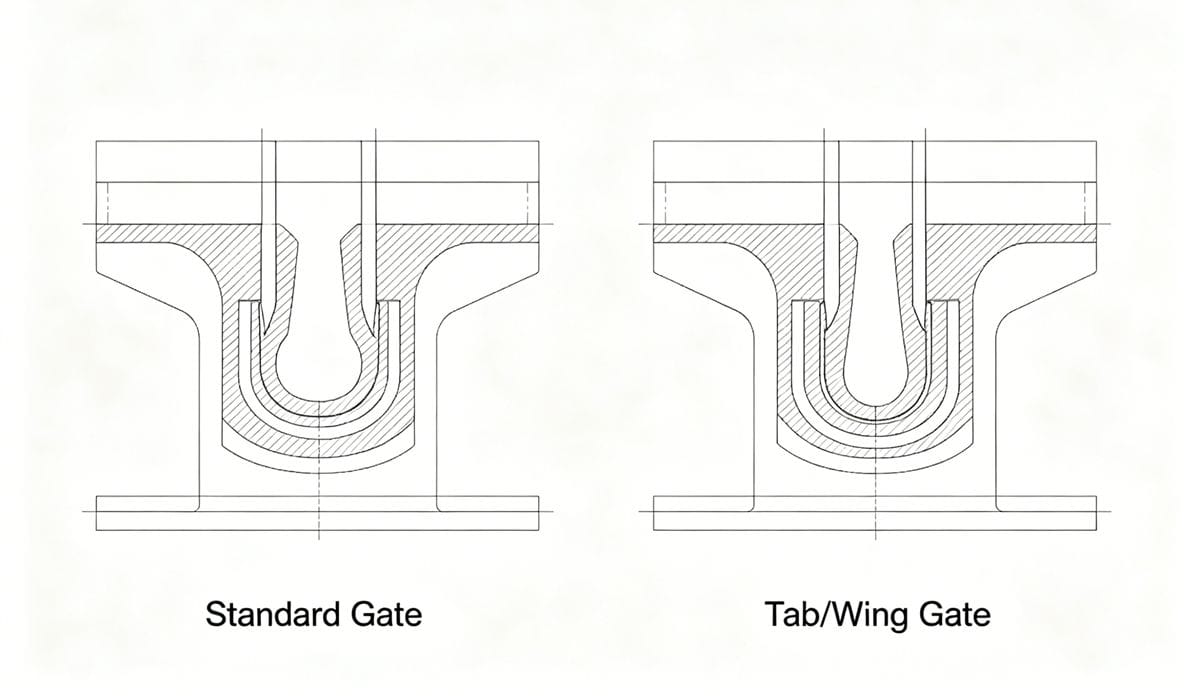
- Gate and Runner Size: Small gates increase flow resistance. 솔루션: Enlarge the gate and runner cross-sections to improve flow.
- Gate Location: Gates should ideally be placed at the thickest section of the part. 솔루션: Redesign the gate location to ensure symmetrical filling and better pressure transmission.
- Flow Obstruction: Sink marks far from the gate indicate flow resistance. 솔루션: Remove "bottlenecks" in the runner system or extend the sprue closer to the defect area.
- Thick Wall Strategy: For thick parts, use a tab gate (wing gate). This attaches a small "wing" to the part, placing the gate on the wing rather than the part itself. The sink mark is transferred to the wing, which is cut off later.
3. Raw Material Issues
The choice of resin plays a critical role in surface finish.
- Shrinkage Rate: Materials with high shrinkage rates are prone to sink marks. 솔루션: For high-precision parts, select low-shrinkage resin grades.
- Moisture Content: Wet material can cause voids and surface defects. 솔루션: Always pre-dry hygroscopic materials (like Nylon or PC) before molding.
- Lubrication: Poor flow can lead to short shots and sinks. 솔루션: Add lubricants to improve melt flow index (MFI).
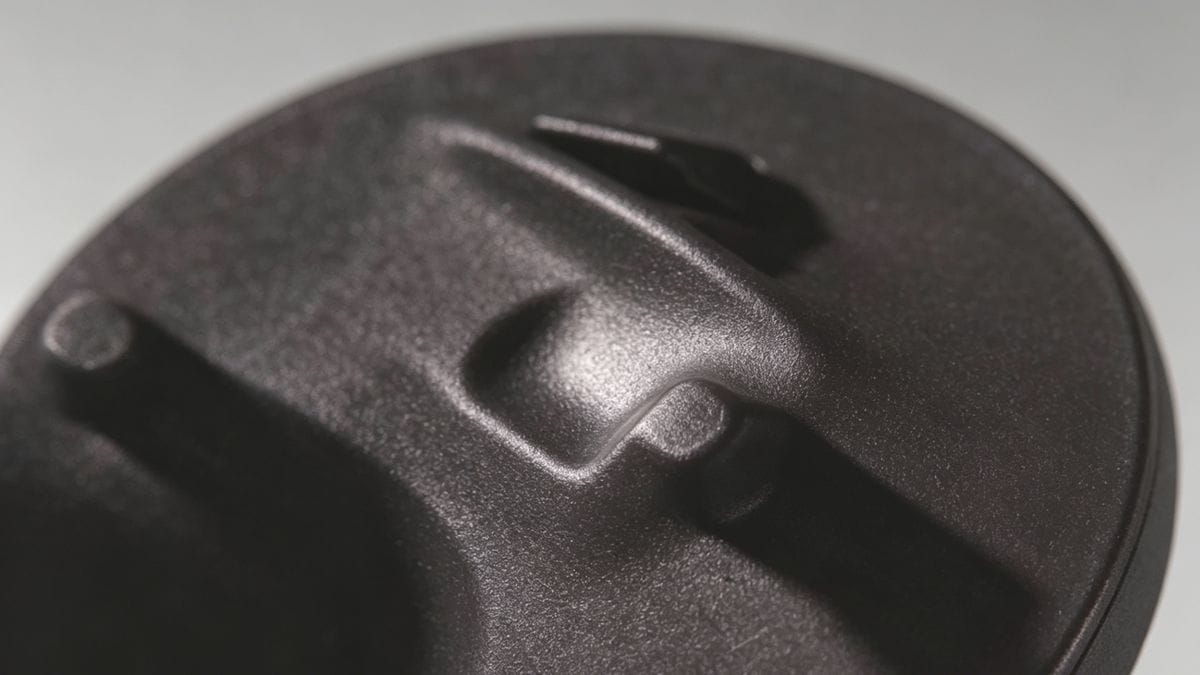
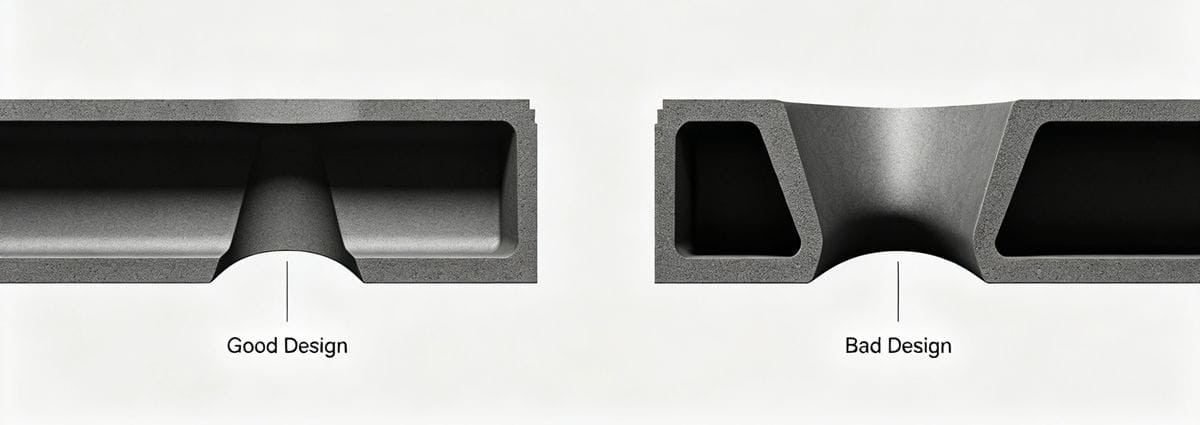
4. Part Geometry Design
The root cause often starts at the product design phase.
- Wall Thickness Uniformity: The most common cause of sink marks is uneven wall thickness. Thick sections cool slower than thin sections, pulling the surface inward.
- Design Rule: Maintain uniform wall thickness whenever possible.
- Coring Out: If a thick section is necessary, "core out" the thick area to reduce mass while maintaining structural integrity.
[Image Suggestion 4]
- Description: A cross-section diagram showing "Good Design" (uniform wall thickness) vs. "Bad Design" (thick ribs causing sinks).
- Alt Text: Plastic part design guidelines showing uniform wall thickness to avoid sink marks.
Summary Checklist for Troubleshooting
| 카테고리 | Key Action Items |
|---|---|
| Process | Increase Holding Pressure & Time; Lower Melt Temp; Increase Cooling Time. |
| Mold | Enlarge Gate/Runner; Move gate to thickest section; Improve cooling channels. |
| 재료 | Pre-dry material; Switch to low-shrinkage resin. |
| Design | Ensure uniform wall thickness; Use coring for thick sections. |
"Injection moulding - Wikipedia", https://en.wikipedia.org/wiki/Injection_moulding. Custom plastic injection molding is a manufacturing process where molten plastic is injected into a mold to create custom-shaped plastic parts, widely used in various industries for producing precise and complex components. Evidence role: definition; source type: encyclopedia. Supports: Custom Plastic Injection Molding. Scope note: The definition focuses on the general process and may not cover all specialized techniques or materials used in custom plastic injection molding. ↩
"Custom Plastic Injection Moulding: A Comprehensive Guide", https://communitycollaborator.eauclairewi.gov/eauclairewi-news/custom-plastic-injection-moulding-a-comprehensive-guide-1767648106. Custom plastic parts refer to plastic components specifically designed and manufactured to meet unique specifications and requirements, often produced through processes like injection molding. Evidence role: definition; source type: encyclopedia. Supports: custom plastic parts. ↩
"Why One Insert Needs Heating… and the Other Doesn't? - YouTube", https://www.youtube.com/shorts/ym7eIkirS6Y. This source discusses the effect of preheating metal inserts on reducing sink marks and improving surface finish in insert molding. Evidence role: mechanism; source type: research. Supports: Preheat the inserts. Scope note: Effectiveness depends on insert material and molding conditions. ↩
"Troubleshooting Injection Molding Sink Marks - Fictiv", https://www.fictiv.com/articles/troubleshooting-injection-molding-sink-marks. Mold design in injection molding significantly influences the occurrence of defects such as sink marks, with factors like gate size, gate location, and flow path design playing critical roles in ensuring proper material flow and pressure distribution. Evidence role: mechanism; source type: encyclopedia. Supports: Mold Design. Scope note: Specific design solutions may vary depending on the type of plastic and part geometry. ↩