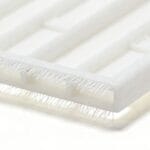
Struggling with sharp, unwanted edges on your molded parts? This flash isn't just ugly; it signals deeper issues that can ruin your project. Let's find the cause.
Excessive burrs, or flash, occur when molten plastic escapes the mold cavity. This usually happens at the parting line between the moving and stationary mold halves, around sliders, or through gaps near inserts and ejector pins. It's a sign that the mold isn't perfectly sealed.

This flash isn't just a minor annoyance. It can act like a lever, forcing the mold open even more with each cycle. This creates bigger burrs and can even damage your mold, leading to a vicious cycle of defects. To stop this, we need to dig into the specific causes, because finding the root cause is the only way to find a permanent solution.
Is Insufficient Clamping Force the Culprit?
Are you seeing flash even with a perfectly good mold? The problem might not be the tool itself, but the machine's clamping force. Let's see why this happens.
If the clamping force is too low compared to the injection pressure1 and the part's projected area, the mold halves can be pushed apart. This creates a tiny gap, allowing molten plastic to escape and form burrs, especially with high-pressure center gates2.

Injection molding works by balancing two opposing forces. The injection unit pushes molten plastic into the mold with immense pressure. The clamping unit holds the two halves of the mold shut with equal or greater force. If the injection pressure wins, it will push the mold open slightly, and you'll get flash. This is especially common for parts with a large surface area, or what we call a large "projected area." Think of it like trying to hold a door shut against a strong wind. A bigger door needs more strength to keep it closed. Similarly, a larger part needs more clamping force. We often see this issue when a side gate is placed near a central hole on a part. This design requires higher injection pressure to fill properly, which puts more stress on the clamping force. The solution involves rebalancing these forces.
How to Fix Clamping Force Issues
| Method | Description |
|---|---|
| Increase Clamping Force | The most direct solution. Adjust the machine settings to a higher tonnage to better resist the injection pressure. |
| Decrease Injection Pressure | If you can fill the part with less pressure, you reduce the force trying to open the mold. |
| Use a Higher-Flow Plastic | Switching to a material that flows more easily can allow you to use lower injection pressures to achieve a complete fill. |
Could a Poorly Fitted Mold Be Causing Flash?
Your clamping force is perfect, but burrs still appear in specific spots. This points to a problem with the mold itself. Let's investigate the fit and alignment.
Flash can be caused by localized gaps in the mold. This might be due to uneven clamping, poor initial mold mating, or wear and tear. Areas around sliding cores, inserts, and ejector pins are particularly vulnerable to poor fits, creating escape routes for the plastic.

A mold is a complex tool with many parts that must fit together perfectly. When they don't, you get burrs. Sometimes, the problem is with the machine. A toggle-style clamping mechanism can apply uneven pressure if the tie bars are not adjusted correctly. This can cause one side of the mold to seal tightly while the other has a small gap. More often, the issue is with the mold itself. If the parting lines weren't perfectly matched when the mold was made, it will never seal properly. The most common trouble spots are moving components. Sliding cores, which form undercuts, can wear down over time and become loose. The small gaps around mold inserts or ejector pins are also prime locations for plastic to escape. This creates a bad situation that gets worse. The flash in these gaps can make it harder to eject the part, causing more wear and creating even bigger burrs in a vicious cycle.
Is Your Mold Bending Under Pressure?
Think your mold is a solid block of steel? Under immense injection pressure, it can actually bend. This deflection creates gaps and is a sneaky cause of burrs.
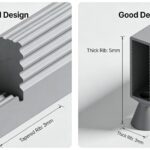
If a mold lacks sufficient thickness or support, the force of the injection pressure can cause it to flex or deflect. This bending is most common in the center of the mold, creating gaps around central features or gates and leading to stubborn burrs.

We call this phenomenon mold deflection. It happens when the mold plates are not thick enough or lack enough support pillars to withstand the injection pressure. The pressure from the molten plastic pushes against the cavity walls, and if the mold isn't strong enough, it will physically bend. This is most likely to happen in the middle of the mold, farthest from the support of the machine platens. I've seen this issue frequently on parts with a central core or a side gate that injects near the center. The pressure is highest in this area, and the mold structure is often weaker due to the hole, which leads to deflection. Burrs caused by mold deflection are very difficult to fix because the problem is in the fundamental design and construction of the tool. The best solution is prevention through good DFM analysis. If the mold is already built, the only real fix is to reinforce it by adding support pillars or re-making the mold base with thicker steel plates.
Is Your Plastic Too 'Runny'?
Using a high-flow plastic can speed up cycles, but it might be too good. This 'runny' material can find even the tiniest gaps in your mold, causing flash.
While high fluidity isn't a direct cause of burrs, it makes the problem much worse. A very fluid plastic can penetrate microscopic gaps in the parting line or around inserts that a stiffer material would not, resulting in thin, hard-to-remove flash.

The "runniness" of a plastic is measured by its Melt Flow Index (MFI)3. A high MFI means the plastic is very fluid and flows easily. This is great for filling complex, thin-walled parts. However, this high fluidity means the plastic will exploit any imperfection in the mold's seal. It's not the root cause of the burr—the gap is the cause—but it's the enabler. A thicker, more viscous plastic might not be able to squeeze through a tiny gap, but a high-flow material will find its way through. If you are seeing thin, almost paper-like flash, your material's fluidity is likely a contributing factor. To combat this, you need to make the plastic less 'runny' at the moment of injection or give it less of a push.
Adjusting Process Parameters for High-Flow Materials
| Parameter to Adjust | How It Helps Reduce Flash |
|---|---|
| Lower Melt Temperature | A cooler plastic is more viscous (thicker) and less likely to flow into small gaps. |
| Lower Injection Pressure | Less pressure means less force is trying to push the plastic out of the cavity. |
| Lower Mold Temperature | A cooler mold surface will cause the plastic to solidify, or "freeze," faster, sealing the gap before flash can form. |
| Lower Injection Speed | Reducing the speed can prevent sharp pressure spikes that might force the mold open momentarily. |
Are You Overpacking the Mold?
You're trying to prevent sink marks by packing in more plastic. But this common fix can backfire, creating pressure that forces out flash and damages your mold.
Injecting too much molten material, often in an attempt to combat sink marks, is not a direct cause of burrs but a related mistake. This 'overpacking' dramatically increases cavity pressure, which can force the mold apart and create flash, just like excessive injection pressure.

Many people think the solution to sink marks is to just push more plastic into the mold. This is a misunderstanding of the process. This approach, called "overpacking," creates more problems than it solves. Once the mold cavity is full of plastic, trying to force even more in causes the internal pressure to skyrocket. This pressure pushes outwards on all surfaces of the cavity, creating a massive separating force that can easily overcome the machine's clamping force. The result is flash. The correct way to fix sink marks is not by adding more material, but by managing pressure over time. By increasing the injection time or the holding pressure time, you allow the plastic to cool and solidify under controlled pressure. This compensates for shrinkage as the part cools without creating the extreme pressure spikes that come from overpacking. So, if you are fighting sink marks and suddenly start seeing flash, you may be overpacking the mold.
Could a Dirty Mold Be Creating Burrs?
You've checked everything, but flash persists. The cause might be something incredibly simple but often overlooked: dirt or debris on your mold's parting line.
Any foreign object, even a small piece of plastic, a stray granule, or a bit of grease on the mold's parting line, will prevent it from closing completely. This creates a uniform gap, allowing molten plastic to escape and form a thin layer of flash.

This is the simplest cause of flash, but it's one we see all the time. The two halves of an injection mold are designed to meet with a perfect, metal-to-metal seal. Even the smallest piece of debris can hold them apart. It could be a bit of plastic from a previous shot that didn't eject cleanly, a stray plastic pellet, a smear of grease from maintenance, or even just dust from the air. When the mold closes on this debris, it cannot seal properly. The clamping force is now being used to crush the foreign object instead of sealing the parting line. This creates a tiny, consistent gap around the debris, and molten plastic will happily fill that gap, creating a burr. The solution is just as simple as the cause: clean the mold. A regular preventative maintenance schedule is critical. Before every production run, the parting line surfaces should be wiped down with a soft cloth and a proper solvent to ensure they are perfectly clean and free of any foreign matter.
Conclusion
Burrs stem from gaps in the mold, whether from low clamp force, poor fit, or dirt. Identifying the specific cause is key to a clean part and a healthy mold.