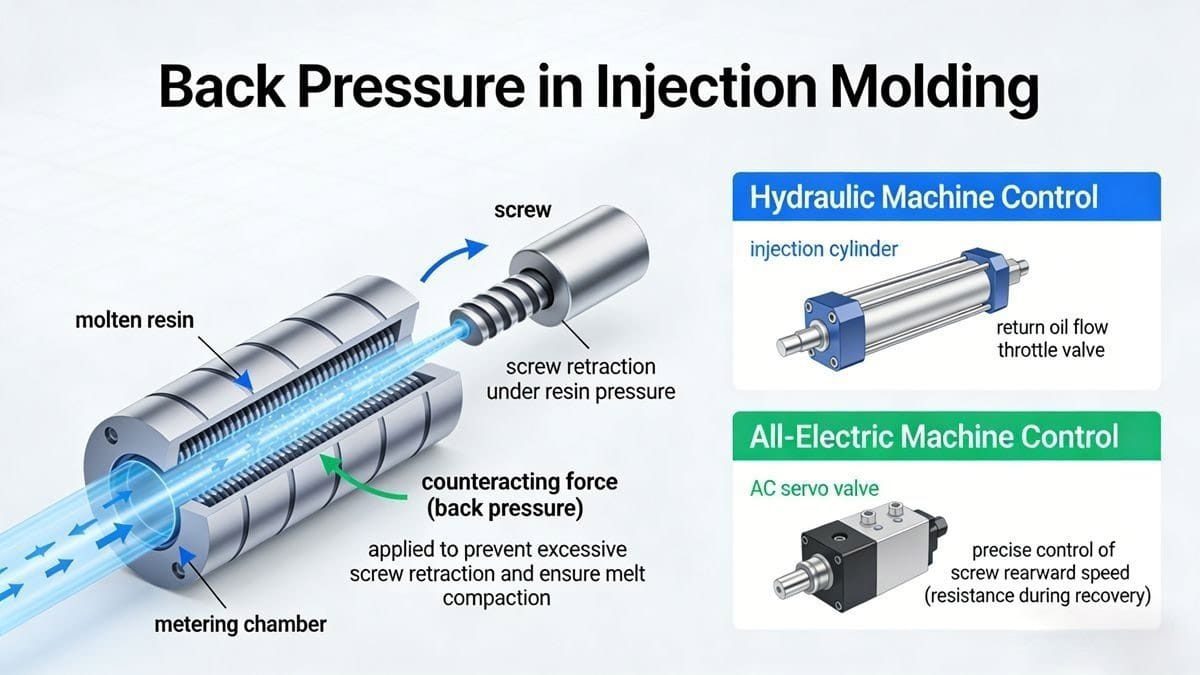
What Is Back Pressure in Injection Molding?
During the plastic melting and plasticization phase, molten resin continuously moves toward the front of the barrel (into the metering chamber), building up pressure that pushes the screw backward. To prevent excessive or uncontrolled screw retraction—and to ensure uniform compaction of the melt—a counteracting force is applied to the screw. This opposing resistance is called back pressure1 (also known as plasticizing pressure2).
In hydraulic injection molding machines, back pressure is controlled via a return oil flow throttle valve in the injection cylinder. In all-electric machines, it is regulated by an AC servo valve that precisely controls the screw’s rearward speed (i.e., resistance during recovery).
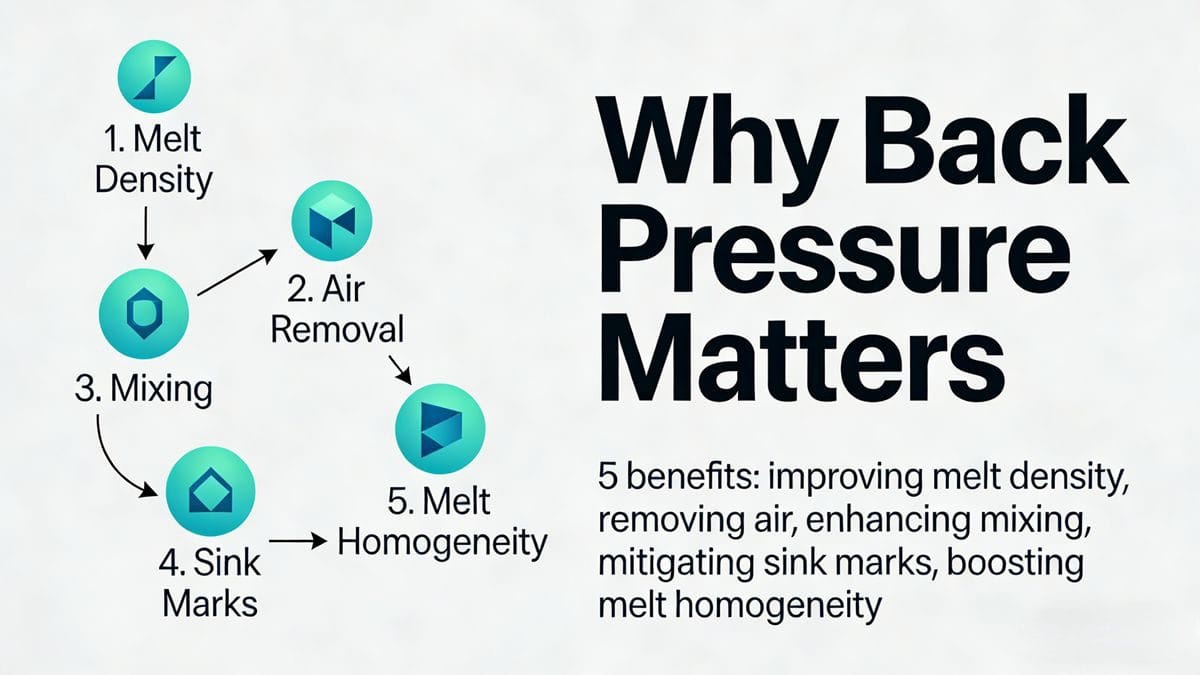
Why Back Pressure Matters: 5 Key Benefits of Proper Adjustment
When correctly set, back pressure significantly enhances both process stability and part quality:
Improves Melt Density & Shot Consistency
Higher back pressure compacts the melt in the barrel, increasing its density. This leads to more consistent shot volume, part weight, and dimensional stability—critical for tight-tolerance components.Removes Trapped Air & Reduces Surface Defects
The compression effect “squeezes out” entrapped air and volatiles, minimizing surface defects such as:- Silver streaks (gas marks)
- Internal voids/bubbles
- Uneven gloss or haze
Result: smoother, more cosmetically acceptable surfaces.
Enhances Mixing & Color Uniformity
By slowing screw retraction, back pressure extends residence time in the shear zone, improving dispersion of:- Colorants (pigments, masterbatches)
- Fillers (e.g., glass fiber, calcium carbonate)
This prevents color streaking, mottling, or inconsistent hue across parts.
Mitigates Sink Marks & Improves Flow at Edges
Optimized back pressure raises melt temperature slightly (via increased shear heating) and improves melt homogeneity—enhancing flow into thin sections, ribs, and corners. This reduces sink marks and improves filling of complex geometries.Boosts Melt Homogeneity & Eliminates Cold Slugs
Better plasticization yields a more uniform melt temperature profile, reducing cold flow lines and eliminating cold slug defects at the gate or runner.
Consequences of Incorrect Back Pressure Settings
🔻 Too Low Back Pressure (< 3 kg/cm²)
- Screw retracts too quickly → low melt density, high air entrapment
- Unstable shot volume → part weight/size variation
- Common defects:
- Sink marks
- Gas marks (silver streaks)
- Poor gloss, cold slugs, incomplete filling (especially at ribs/edges)
- Internal bubbles
🔺 Too High Back Pressure (> 15 kg/cm²)
- Excessive shear heat → thermal degradation (especially for heat-sensitive resins like PVC, POM, or certain colorants)
- Increased melt pressure → higher leakage at screw/barrel clearance & nozzle drool
- Longer recovery time → extended cycle time → reduced productivity
- Risk of:
- Nozzle leakage (damaging heater bands)
- Cold slug spots due to drool solidifying in sprue
- Accelerated wear on screw, barrel, and drive components
⚠️ Note: For thermally sensitive materials, even moderate back pressure (8–10 kg/cm²) may require close monitoring of melt temperature.

How to Optimize Back Pressure: Practical Guidelines
Back pressure must be tuned based on:
- Resin type (e.g., PP vs. PC vs. TPU)
- Drying condition (moisture = more volatiles → needs higher back pressure)
- Part geometry (thin walls, large surface area, inserts)
- Quality requirements (cosmetic vs. structural)
Typical Range:
✅ 3–15 kg/cm² (≈ 0.3–1.5 MPa) for most engineering plastics
- Start low (e.g., 5 kg/cm²), then incrementally increase while monitoring:
- Melt temperature (avoid > material’s max processing temp)
- Recovery time (should not exceed 60–70% of total cycle time)
- Visual defects (gas marks, color streaks, sink)
When to Increase Back Pressure:
- Visible gas marks, color inconsistency, sink marks3
- Large weight/size variation between shots
- Poor filling at edges or ribs
When to Decrease Back Pressure:
- Nozzle drool or leakage
- Material degradation (yellowing, black specks)
- Overly long recovery time
- Cold slugs or runner blockage
For multi-material runs (e.g., switching from ABS to PET), always recalibrate back pressure—material-specific viscosity and thermal behavior demand unique settings.
Final Thoughts: Back Pressure Is a Foundational Parameter
Back pressure is far more than a “fine-tuning” knob—it’s a core lever for controlling melt quality, part consistency, and overall process robustness. Ignoring it risks recurring defects, scrap, and inefficiency. Conversely, mastering back pressure enables:
- Higher first-pass yield
- Reduced need for post-molding correction
- Better repeatability across shifts and machines
Invest time in systematic back pressure trials—document melt temps, recovery times, and part inspections. Combine with DOE (Design of Experiments4) for data-driven optimization.
📌 Pro Tip: Pair back pressure adjustments with screw rotation speed (RPM) and barrel temperature profiling for synergistic improvement.
Understanding back pressure is crucial for optimizing injection molding processes and improving part quality. ↩
Learn about plasticizing pressure to enhance your knowledge of injection molding techniques and their impact on product quality. ↩
Understanding the causes of sink marks can help you improve the quality of your injection molded products. ↩
Explore how Design of Experiments can help you systematically optimize injection molding parameters for better results. ↩